Showing posts with label Bread. Show all posts

Sunday, November 22, 2009

Garlic and Parsley Bread


Garlic bread is my all time favorite and I just love the aroma of the garlic and the crunchiness of the bread. Hmm… yummy! I used baguette bread for my garlic bread but you can make it with other breads. So, choose your favorite!

Oh yeah, I’ve added some parsley as I thought it will look more colorful and I’ve also added some paprika so that it’ll taste a bit spicy. Well, they were great! Crispy and fragrant!!! = )
Ingredients

1 long baguette breads
3-4 garlic cloves, finely chopped
A bunch of flat leaf parsley, chopped
½ tsp paprika
Olive oil
Sea salt and freshly ground black pepper

What to do

(1) Slice each baguette diagonally at 1.5cm intervals.
(2) Sprinkle the garlic, parsley, paprika, salt and pepper evenly over each baguette.
(3) Drizzle generously with olive oil and place on a baking tray.
(4) Bake for 10 to 15 minutes or until hot and crisp. Serve.

Sunday, November 15, 2009

Raisins Bun

… another bread baking! Raisins are my favorite dried fruits and I wanted to have it for my breakfast so here’s how my raisins bun turned out!

The bread recipe is simple and easy to make. I found this recipe from one of the food blogs – Do What I Like. You can find a lot of goodies in this food blog. Do hop over her blog and enjoy those goodies. Thanks Florence for sharing such a wonderful recipe.

I love the crusty top of the bread. This is how useful the egg wash is! They look so shinny and tempting, right? ^_^


Recipe taken from here

Ingredients

(A)
300g bread
15g sugar
15g brown sugar
1/2 tsp salt
10g milk powder

(B)
30g egg + milk = 165g (lightly beaten)

(C)
9g fresh yeast dissolved in 1 tbsp water

(D)
25g butter
75g raisins


What to do
1. Mix (A) in a mixing bowl till well-mixed.
2. Add in (B) and mix till rough dough state then add in (C) and knead till you get a nice dough.
3. Add in the butter, knead till butter is mixed in, then add in the raisins. Knead till you get a smooth and shiny dough which passes the windowpane test.
4. First prove: prove for 60 minutes at about 28C.
5. Division: divide dough into 3 pieces, shape it into round balls and rest dough for 30 minutes.
6. Shaping: shape dough and put dough into loaf pan.
7. Final prove: prove for 50 minutes at about 30C. 8. Baking: bake at 190C for 35 minutes.

Notes: For shiny crust, apply egg white to the top of the final proved bread.

Thursday, November 12, 2009

Crusty White Loaf

Baking cheers me up! Even after a long day at work and spending an hour at fitness class, I still feel like doing some baking. = )

I haven’t baked any bread for a while and I just realized that I had a few pack of bread flour still sitting in the pantry. Hence I decided to bake a basic white loaf. It is a simple type of everyday bread and the steps involved in making this bread are very easy too! Well, here you go…


------------------------------------ 20 minutes later ---------------------------------------


The outer layer was crispy and the inner was fluffy and soft. It taste good serve with my favorite blueberry jam as breakfast!


Ingredients

300g bread flour
3g yeast
190ml milk, warmed

What to do

(1) Blend bread flour and yeast in a large bowl.
(2) Add warmed milk and mix to form a dough.
(3) Knead vigorously for at least 10 minutes, until he dough is smooth and elastic.
(4) Place dough into a bowl, cover with a damp cloth and allow to stand in a warm place until double its size (approximately 40 minutes).
(5) Place dough on a floured surface and knead lightly to degas the dough. Shape dough and place in an oiled bread tin and allow the dough to rise (proof) until at least double its size.
(6) Bake in oven at 180 degree for 20 minutes or until golden brown.

Tuesday, September 1, 2009

Ham and Cheese Wheel

This recipe was taken from a kids’ cookbook and it is very easy to prepare! ^_^


The original recipe uses ready made puff pastry. I didn’t have it in my freezer so I used bread dough instead. The bread dough recipe can be found here; my previous bread baking. Of course you will need to spend some time to make the bread dough compared to if you use ready made puff pastry.

After the dough is ready to use, roll the dough with a rolling pin and press the dough into a rectangle size. Spread some butter over the dough then sprinkle some cheddar cheese (30g, divided into half as the other half will use later) all over and place the slices ham (5 slices) on top and again sprinkle the other half of the cheddar cheese on top of the ham.

Roll up into fairly loose coils and cut the dough into 2cm thick slices and arrange on an oven tray. Bake for 15 minutes until crispy and golden then remove to a rack to cool. Serve warm.

Crispy, Cheesy, Yummy!

Saturday, August 15, 2009

Chocolate Chips Swirl Bun

I was reading through my frequent food blogs and was attracted by this wonderful bun recipe from Elinluv’s Corner. The buns look so delicious.

It was so fun to see them rising in the oven and the aroma of the chocolate was very nice. It made me mouth watering… I can’t wait to try them! :P Frankly, it was really really good. Like Elinluv said, “Two thumbs up for this delicious bun”. For my version, I’ve modified the ingredients a little in which I added in some chocolate chips. You can find the original recipe here.
Before

After

Closer look!

Smell good + Taste good = Yummy!


Ingredients

300g bread flour
1+ ½ tsp instant yeast
1+ ½ tbsp milk powder
50g caster sugar
½ tsp salt
125ml milk
1 egg
20g olive oil
40 dark cooking chocolate, melted
20g chocolate chips

What to do

(1) Put the bread flour and yeast in a bowl, whisk to combine, add in milk powder, sugar and salt whisk again. Pour in milk and egg into the bowl, use spatula to mix everything together till form soft dough.
(2) Knead the dough until soft, smooth and elastic about 10-15 minutes. In the mean time, put olive oil in a large bowl and transfer the dough into the bowl. Let the dough rise in a warm place until double in size.
(3) Take the dough out of the bowl. Gently press down the dough. Use the rolling pin to roll the dough into rectangle shape. Spread the melted chocolate mixture all over and sprinkle some chocolate chips on top.
(4) Roll the dough up and cut the dough into 8 pieces, and then place into the baking pan.
(5) Let the dough rise until almost double in size again and bake for 15 minutes or until the bread is golden brown.


Sunday, August 2, 2009

Mini Doughnuts

Hubby bought me this mini doughnuts maker sometimes ago. We managed to get this doughnuts maker with a very good price as they were having sales. I was so happy to see the doughnut’s maker. It is so cute!!! Now, I can make doughnuts in any flavor that I like. Isn’t it fantastic? = )

I followed the recipe from the user manual. Simple and easy to prepare! I was excited about the decoration for the doughnuts. I have some cooking chocolates in my pantry. I wanted to coat white chocolate and dark chocolate on my doughnuts. Unfortunately I’ve prepared too much white chocolate and not wanted to waste, I have to finish coating all my doughnuts with white chocolate instead. Well, I will have to try the dark chocolate coating next time then. = (


This is my little doughnuts maker! (",)
Hmm… they all look so cute, don't they?


Ingredients

225g plain flour
80g sugar
1 ½ tsp baking powder
½ tsp salt
100g butter, softened
1 egg
200ml milk

What to do

(1) In a large bowl, stir in flour, sugar, baking powder and salt to combine.

(2) Add in butter, egg and milk. Beat with electric mixer until the mixture is thick, smooth and creamy.

(3) Preheat doughnut maker for 4-5 minutes. Spoon 1 tablespoon of the mixture evenly into each hole. Close lid and cook for 2 minutes or until doughnuts are golden brown and soft to touch.

(4) Carefully remove hot dougnuts from the doughnuts maker and place onto a wire rack.


Saturday, May 16, 2009

Berries Yogurt Bread

I was reviewing back my blog and realized that it’s been a while since I baked bread. I still had 6 packs of bread flour sitting in my pantry, hiding behind the plain and self-raising flour. No wonder I never thought of using them. Poor bread flour…

After I decided to bake bread I went to the food blogs that I used to visit to search for bread recipe and I found this Yogurt Bread from Pure Enjoyment blog. The bread that she baked looks so yummy. It makes me eager to try it now. Last weekend when I went for grocery shopping at Safeway, I had bought 2 big tubs of yogurt which were on sales. I had bought 2 flavors which were berries and fruit salad. The original recipe used plain yogurt but I used berries yogurt that I bought.


I followed exactly the same for the others ingredients and steps. The bread was really soft and fluffy! It was so NICE! Thank you, Pure Enjoyment for the bread recipe. The bread was looking good before I sliced it. Well, it became “ugly” after I sliced it with my “terrible” slicing skill. :P I will need to buy the bread slicing equipment in the future as now I use a kitchen knife to “cut” but not “slice”.

First Proofing

Second Proofing

Egg wash the top of the buns and sprinkle some sesame seeds

Ok, here you go…my **Berries Yogurt Bread** done!

Hmm...bad slicing! =D

Here is the link for the recipe


Enjoy! ^_^

Tuesday, May 5, 2009

Kaya Pao

My colleague gave a jar of homemade Kaya few days ago. There’s a recipe which came across my mind, Kaya Pao. I had a pack of pao flour sitting in my pantry for some times and now it is the perfect timing for me.

It is very simple. You will only need to mix the flour with 255ml milk and 100g sugar. Knead dough well for 10 minutes and add in 1 tbsp of olive oil. Continue to knead and leave aside for 30 minutes.


30 minutes later…

Alright, now I am going to divide the dough into 12 parts. Roll each piece into small round shape and flatten it. Place a small portion kaya into the center of each rolled out sheet and fold the sides over the filling. Place each pao on a piece of baking paper.


Now, place the steamer filled with water on high heat. Add 2 tbsp of vinegar into the water to whiten the paos. Steam it for 10 minutes, lit out the cover to remove any condensed water and continue to steam for further 10 minutes. Remove the paos from the steamer and serve warm.

Here’s my kaya paos. Looking good eh…hehe

Photos without "Flash"

Hmm…it taste good. This is my first attempt of making pao. Mission successful!!!

Saturday, April 11, 2009

BBQ Sausages Pizza

This is my 2nd attempt on baking pizza. I am really into homemade pizza. I had made some changes to the sauce; I had replaced the tomato sauce with BBQ sauce. Actually this BBQ sauce has been sitting in my fridge for some time. I wanted to finish it ASAP so buy some other sauces.

There were no changes to the pizza dough but I made some changes to the topping and the outlook. I didn’t cut the pizza into wedges shaped but I had rounded it. Something different from the classic pizza…= P


Ingredients (Topping)

2 lean beef sausages
300g barbecue sauce (to spread on the pizza base)
60g veggie mixed
1 medium size of green capsicum, sliced
5 medium button mushrooms, sliced
200g tasty cheese

What to do

(1) Spray a large frying pan with oil. Heat over medium heat. Cook sausages, turning occasionally, for 10 to 12 minutes or until cooked through. Allow to cool. Thinly slice.

(2) Line a large baking tray with baking paper. Place pizza base on prepared tray. Spread base with barbecue sauce. Top with sausage, veggie mixed, capsicum and button mushrooms.
(3) Sprinkle with cheese. Bake for 15 to 20 minutes or until cheese is melted and serve.


Tuesday, April 7, 2009

Multigrain Bread

I had bought a pack of multigrain bread flour as multigrain or wholemeal bread is delicious and perfect for a healthy lifestyle. I like multigrain bread loaf because of the combination of oats, toasted cracked wheat and flax meal. They taste just like muesli or rolled oat. I noticed that not many people like to eat multigrain bread compared to white bread. Multigrain or wholemeal bread are healthier than white bread loaf though. Hence, you should give it a try on this recipe. It is not complicated. Easy! = )


Ingredients

(A)
300g multigrain bread flour
35g brown sugar
1/2 tsp salt

(B)
1tsp yeast
170ml milk

(C)14g olive oil


What to do

(1) Combine ingredient (A) in a mixer and mix well. Add in ingredient (B) and beat till dough is formed. Add in ingredient (C) and beat till dough is smooth and elastic.

(2) Leave the kneaded dough in a big bowl, covered with cling wrap. Let it ferments for about 60 minutes or until the dough is double it size.

(3) Take out the dough from the bowl and punch out the air.

(4) Roll the dough into a ball and place on the baking pan.

(5) Cover with cling wrap and let it rest for 30 minutes or until the bun is double it size again.

(6) Bake in a preheated oven at 180 degree for 15 minutes.

Sunday, April 5, 2009

Homemade Pizza

Pizza Pizza Pizza!!! Who don’t like pizza??? Everybody loves pizza (I think, at least all of my friends they do), except my hubby. = (

My aunty who stays in KL did teach me how to make pizza few years ago when I was studying in Cyberjaya. Well, it was difficult for me to do the pizza base. I tried once with failure (few years back). Since then I have never tried to bake pizza until now…

I had done some researching in the internet and try to learn the ways of making the base. I found that it is not hard at all! It is almost the same like making bread dough. Hmm…I must be very lousy previously. Haha…

I also found that we can make the pizza sauce ourselves which only require a few ingredients. So, for this pizza, I made the base and the sauce myself. I am very satisfied with the result. ^-^


Pizza dough

Ingredients

7g dry yeast
8g sugar
180ml lukewarm water
40ml olive oil
350g plain flour
11/2 tsp salt

What to do

(1) Stir yeast, sugar and 40ml of the water together in a small bowl until well combined. Cover and leave the yeast mixture for about 30 minutes or until it is bubbling and foamy.

(2) Add oil and remaining water to the bowl with the yeast mixture and stir together.

(3) Stir flour and salt together in a large bowl until well combined. Make a well in the center and pour in the yeast mixture. Combine using a spoon then use your hands to bring the dough together.

(4) Use your hand to transfer the mixture to a lightly floured surface. Knead the dough for 5 minutes until the dough should become smooth and elastic.

(5) Place dough in a large oiled bowl and turn dough to coat with oil. Cover bowl with plastic wrap then a clean tea towel. Put bowl in a warm place until dough has doubled in size, about 2 hours.

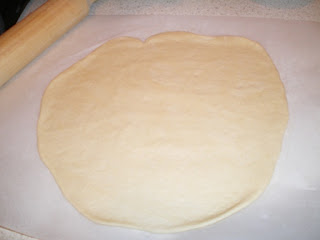
(6) Punch down the dough and knead for a couple of minutes. Divide the dough into two balls. Press each dough ball out flat and using a floured rolling pin, shape into a 25-30 cm (10-12 inch) diameter circle. Using your knuckles, press just inside the edge to raise them slightly. Leave to rest for 10-15 minutes. Preheat oven to 230 degree.

(7) Top with pizza sauce and toppings of your choice. Cook in the oven for 10-12 minutes or until crispy and golden and the base is cooked.

Pizza sauce

Ingredients

1 small onion, peeled and finely diced
20ml olive oil
1 garlic clove, peeled and crushed
405g can diced Italian tomatoes paste
4g brown sugar
1/2 tsp dried oregano
Salt and pepper

What to do

(1) Heat oil in a non-stick frying pan over medium heat. Add onion and garlic. Cook for 5 minutes or until tender. Add tomatoes, brown sugar, a good pinch of salt, and pepper. Cook, stirring with a wooden spoon for 7 minutes or until sauce comes to the boil.


(2) Reduce heat to medium-low. Simmer for 10 minutes or until sauce thickens. Spoon into a food processor and process until smooth. Stir in oregano.


Oh ya, my homemade pizza toppings are very simple. I used pineapple (can), green capsicum (sliced), grated mozzarella cheese and some sliced ham that I got in my fridge. I will definitely make this pizza again but with different topping. I already have some toppings ideas for my next homemade pizza. = D


Wednesday, March 4, 2009

Mini Sausage Bun

Bun bun bun again…haha. You must be wondering how come it is bun again? Well, homemade bun is really good to eat and easy to bake too! I love homemade bun. = )
Ok, this is my little sausage bun. They look so cute!


Recipe taken from My Home Kitchen
Ingredient A
300g bread flour
1/2 tsp salt
1+1/2 tbsp milk powder
50g caster sugar

Ingredient B
125ml water
1+1/2 tsp instant yeast
1 egg

Ingredient C
40g butter (I use 40g corn oil) 20g

For glazing
Milk

For filling
8 pieces chicken sausages

What to do

1. To make bread dough: Combine ingredient A in a mixer and mix well. Add in ingredient B and beat till a dough is formed. Add in ingredient C and beat till dough is smooth and elastic to the touch.

2. Leave dough in a big bowl, covered with a damp cloth. Let it rise in a warm place for 35 minutes until double its original size. Divide dough into 35g portions. Flatten and roll out each portion dough into a longish shape. Place a halved sausage roll in the centre, roll up and seal. Arrange on a greased tray, well spaced apart. Cover and rest for the next 40 minutes until buns double in size once again.

3. Glaze with milk and sprinkle some sesame seed on top. Bake buns in a preheated oven at 180 deg C for 15 minutes. Cool well on a wire rack.

Note: I had modified a little from the original recipe.

Friday, February 27, 2009

Little Bread Loaf

It is time for me to try on bread loaf! There are many ways for eating white bread such as you can make it as sandwich, toast and eat with jam, French toast and also you can make few kind of filling and just eat with the white bread like sausages, ham, scramble egg, tuna, sardine and many more! I do not have the square pan for the bread so I am using my little baking pan. This is why I name it as “Little Bread Loaf” = P


15 minutes later...

I thought wanna "plastic surgery" my little bread loaf to make it looks like French bread (which has flour sprinkle on top) = P

The original

"Cute little bread" = D

My breakfast!!!
@Hardboiled-egg on toast@


Yum ^-^ Yum
Ingredients

(A)
200g bread flour20g plain flour
Castor sugar 25g
Salt 1/4 tsp
(B)
Instant yeast 3g (1/2 tsp + 1/4 tsp)
Milk 115g
(C)
10g butter

What to do

(1) Combine ingredient (A) in a mixer and mix well. Add in ingredient (B) and beat till dough is formed. Add in ingredient (C) and beat till dough is smooth and elastic.
(2) Leave the kneaded dough in a big bowl, covered with cling wrap. Let it ferments for about 60 minutes or until the dough is double it size.
(3) Take out the dough from the bowl and punch out the air.
(4) Roll the dough back and forward to form a rope and fold the ends of the dough under so that it can fit into the baking pan.
(5) Cover with cling wrap and let it rest for 30 minutes or until the bun is double it size again.
(6) Bake in a preheated oven at 180 degree for 20 minutes.

(Note: I let my dough fermented overnight)

LinkWithin

Related Posts with Thumbnails