Thursday, December 31, 2009

Chocolate Butter Cake


Well, this is my last baking for year 2009! This is a simple yet delicious chocolate butter cake for my colleague whose birthday is on 1 Jan 2010.

I’ve used some colorful sprinkles and smarties for decoration. I love the color; they look so beautiful and so tempting to me! Hehe...


Ingredients


120g unsweetened chocolate, chopped
28g unsweetened cocoa powder
240ml boiling water
315g plain flour
2tsp baking powder
1tsp baking soda
1/4tsp salt
226g unsalted butter, room temperature
400g castor sugar
3 eggs
240ml milk

Frosting

140g unsweetened chocolate, chopped
80ml milk
113g unsalted butter, softened and cut into pieces
440g icing sugar


What to do


(1) In a heatproof bowl, place the chopped unsweetened chocolate and cocoa powder. Pour the boiling water over the chocolate and cocoa powder and stir until they have melted. Set aside to cool while you make the batter.

(2) In a separate bowl, whisk to combine, the flour, baking powder, baking soda, and salt. Set aside.

(3) In the bowl of your electric mixer, cream the butter. Gradually add the sugar and continue beating until the mixture is fluffy. Add in eggs, one at a time, mixing well after each addition. Add the melted chocolate mixture and beat to combine.

(4) Add the milk and flour mixtures in three additions, beginning and ending with the flour mixture. Beat only until the ingredients are incorporated.

(5) Divide the batter evenly into the prepared pans and smooth the tops. Bake for about 35 - 40 minutes or until a toothpick inserted in the center comes out clean. Remove from oven and place on a wire rack to cool for about 10 minutes. Cool the cakes completely before frosting.

Frosting

(1) Melt the chopped chocolate in a stainless steel bowl placed over a saucepan of simmering water. Remove from heat and let cool.

(2) Place the melted chocolate, milk and icing sugar in the bowl.

(3) Add the pieces of softened butter and beat on low speed for about 2 minutes. When the frosting starts to come together increase the speed to medium and beat for about 2 to 3 minutes or until smooth.

(4) Scrape down the sides of the bowl with a rubber spatula. Increase the speed to high and beat the frosting for 1 - 2 minutes more or until it is of spreading consistency. If necessary, add more milk or sugar.


Tuesday, December 22, 2009

Christmas Cookies and Cupcakes

3 days to Christmas! I’ve prepared some goodies to give away to friends and colleagues.

For the cookies, I used classic butter cookies recipe taken from Joy of Baking. I’ve shaped the dough with difference sizes of star cutters. Then, after baked, I sprinkled them with icing sugar which made them look snowy. ^_^

I’ve replaced the granulated white sugar with raw sugar which came out nicely. I still can feel the sugar crusty while biting the cookies. Plus, it was not too sweet at all. It was yummy!

Christmas Cookies


Christmas Cookies recipe

Ingredients
226g unsalted butter
135g raw sugar
1 egg
1tsp lemon zest
295g plain flour
1/4tsp salt

What to do
(1) Cream the butter and sugar in a bowl until light and fluffy. Beat in the egg and follow by the lemon zest.
(2) In a separate bowl, whisk together the flour and salt. Gradually add the flour mixture to the creamed mixture and beat just until incorporated.
(3) Make the mixture into a ball and wrap it with cling wrap, and leave it in fridge for 10 minutes.
(4) Shape the cookies with cookies cutter and arrange them on the baking tray.
(5) Bake in the preheat oven at 180 degree for 15-20 minutes.

Christmas Cupcakes


For the mini cupcakes, please click here for the recipe. I’ve added some dried cherry as decoration on top.


Aren’t they cute?


Packaging the cupcakes and give away to my friends and colleagues…


Cute little Santa wishing you
**Merry Christmas n’ Happy New Year**

Wednesday, December 16, 2009

Vanilla Cupcake with Chocolate Frosting

Yay! This is my first attempt to make an icing. I am glad that it turned out “not too bad looking” and it was not as difficult as I had thought.

However, I am still not satisfied with my icing swirling skill. I will need to practice more on my swirling skill and make it look better for my next baking! = )

Overall, I am still happy with it… (^_^)


Vanilla Cupcakes


Chocolate Icing


Ta da... My cupcakes!


Ingredients


100g butter, softened
185g castor sugar
1tsp vanilla bean paste
2 eggs
250g self-raising flour
125ml milk
Chocolate Frosting
100g butter, softened
450g chocolate icing sugar mixture
60ml milk


What to do


1. Cream the butter, sugar and vanilla bean paste with an electric mixer. Add the eggs, one at a time, and beat until just combined. Add the flour and milk in alternate batches and stir with a wooden spoon until just combined.

2. Spoon mixture evenly and bake for 15-20 minutes or until cooked through. Remove from oven and transfer to a wire rack to cool completely.

3. For the frosting, use an electric mixer to beat the butter until very pale. Gradually add the icing sugar while beating. Add the milk and beat until well combined.

4. Fill a piping (icing) bag fitted with a star tube with the icing and pipe swirls on the cupcakes.

Tuesday, December 15, 2009

Lemon Cheesecake


I know Cheese = FAT, but somehow I adore cheesecake as they tastes delicious. Well, once in a while if I pamper myself with a slice of my favorite cheese cake, I think it wouldn’t hurt much! Also, Cheese is high in calcium which is good for my bones! (Ha! I am trying to find more excuses to make myself feel better) :P

This is my second attempt on cheese cake. Since I still have plenty of lemons, I might as well turn them into Lemon Cheese Cake!!!

The cheese cake tastes awesome!!! It was very soft and creamy.


Ingredients


Base
1100g Nice biscuits (Arnott’s brand)
40g butter, melted
Filling
300ml whipping cream (chilled, I used Bulla Thickened Cream)
250g cream cheese, soften at room temperature
50g icing sugar
45ml lemon juice

What to do


(1) Mix biscuit crumbs & melted butter together and press firmly with the help of a spoon onto the base of a 18cm cake tin. Chill for 30 minutes.

(2) Beat whipping cream with electric mixer until 70% stiff or until mousse-like. Do not over mix. Takes about 2 to 3mins on low speed. Keep in the fridge.

(3) With an electric mixer, beat cream cheese, icing sugar and lemon juice until smooth & creamy. Blend in whipping cream with a spatula.

(4) Pour the mixture into the base and spread, put the tin back into the fridge until the topping has set.

Sunday, December 13, 2009

Blueberry Pancakes


Good Morning, sunshine! Start the day with yummy breakfast is very important. I’ve prepared this lovely pancake for our breakfast on Sunday morning.


The blueberry pancake taste absolutely delicious as I served it with maple syrup. They were flavorsome. I’m lovin it!!!


Ingredients

250g plain flour
2tsp baking powder
1tsp bicarbonate of soda
75g sugar
2 eggs
80g unsalted butter, melted
310ml milk
310g blueberries, fresh or frozen
Maple syrup to serve


What to do

(1) Sift the flour, baking powder and bicarbonate of soda into a large bowl. Add the sugar and make a well in the centre.

(2) Add the eggs, melted butter and milk to the dry ingredients, stirring just to combine (add more milk if you prefer a thinner batter). Gently fold the blueberries into he batter (leave some for serving).

(3) Heat a frying pan and brush lightly with melted butter or oil. Drop tablespoon of batter into the pan and cook over low heat until bubbles appear and pop on the surface.

(4) Turn the pancakes oven ad cook the other side. Transfer to a plate and cover with a cloth to keep warm while you cook the rest of the batter.

(5) Serve warm with some blueberries, a drizzle of maple syrup.

Lemon Cake

I was in the mood for baking again! I can’t help myself not to be busy in the kitchen after a long day in the office. :P

I was craving for something savory and I found there were some lemons in the fridge. Without faltering, I decided to bake lemon cake which is simple yet delicious!

I found that the outlook for the lemon cake was too plain. Suddenly Christmas spirit came across my mind so I’ve sprinkled some icing sugar on top. After some “make up” with the lemon cake, they looked much better. “Ta da” here I present you my * Christmas Lemon Cake*.


There were some remaining batters so I pour them into muffin cup. See, after the make over, it looks so cute, isn’t? I just simply love the star on top of the cake! It gives me Christmas feel… = )


It taste a little bit sour which is very appetizing! It was really good! Enjoy~

Ingredients
125g butter, softened
1 tbsp finely grated lemon rind
220g caster sugar
2 eggs
150g self-raising flour
75g plain flour
125ml milk
Topping
125ml lemon juice
55g caster sugar


What to do

(1) Beat the butter, rind and sugar in a small bowl with an electric mixer until light and fluffy. Add the eggs, one at a time, beating until combined between additions.
(2) Stir in the sifted flours in two batches with the milk. Spread the mixture into the prepared pan and bake in a moderate oven for about 45 minutes or until the cake is cooked when tested.
(3) For the topping, combine the lemon juice and sugar in a jug; stir until the sugar is dissolved.
(4) Pour the topping over the hot cake; allow cake to stand for 15 minutes before turning the cake onto a wire rack to cool.


Wednesday, December 9, 2009

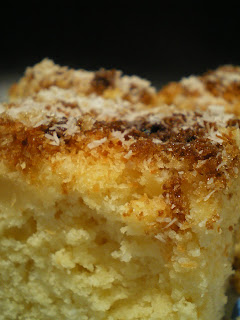
Pineapple Coconut Slice

This Pineapple coconut slice is kinda similar to my earlier baking – Pineapple Coconut Muffins. Since I had some leftover ingredients from my previous baking and I came across this recipe from Super Food Idea Magazine, I thought it was a good idea to fully utilize the remaining ingredients. Hence, here is my Pineapple Coconut Slice.


While baking, the aroma of the pineapple and coconut was extremely alluring. I just like the fragrance flowing out from the oven!


I just like the fragrance flowing out from the oven! I'm glad that the outcome was beautiful. It was fluffy, moist and flavored with desiccated coconut and pineapple.


It was so delightful! Love it! (*_*)

Here you go for the recipe. Enjoy~

Ingredients
440g can pineapple pieces in juice
150g butter, softened
160g caster sugar
1tsp vanilla essence
2 eggs
310g self-raising flour
160g desiccated coconut
60g shredded coconut


What to do
(1) Preheat oven to 180 degree. Grease a 3cm-deep, 16cm x 26cm (base) slice pan. Line base and sides with baking paper, leaving a 2cm overhang at long end. Drain pineapple, reserving 80ml juice.
(2) Using an electric mixer, beat butter, sugar and vanilla until light and fluffy. Add eggs, 1 at a time, beating after each addition,
(3) Add flour, desiccated coconut and pineapple juice. Stir until just combined.
(4) Spread mixture into prepared pan. Top with pineapple. Sprinkle with shredded coconut. Press into top.
(5) Bake for 40 minutes or until a skewer inserted in centre come out clean and slice is firm when lightly touched in centre.
(6) Cool in pan for 10 minutes. Lift out onto a wire rack to cool completely. Cut into 12 squares. Serve.

Note: I’ve sprinkled some shredded coconut follow by brown sugar. I simple love the combination of brown sugar with shredded coconut! = )

Sunday, November 29, 2009

White Chocolate n’ Almond Blondies


Christmas is just around the corner and I was planning to make some Christmas goodies from the Christmas recipe books that I bought last week. There are a few Christmas recipes that I wanted to do and I already listed into my “to do” list.

My first Christmas goodies this week was **White Chocolate n’ Almond Blondies**from Taste.com.au – The Very Useful Christmas Book. You can also get the recipe online here.


The aroma of the blondies was strong which make me mouth watering while baking. Hehe… I helped myself with 2 of the biggest slices after it was done! A sinful craves… ashamed after I had it. =( Nevertheless, more fitness class to attend!


Ingredients

75g unsalted butter, chopped
300g white chocolate, roughly chopped
3 eggs
90g castor sugar
2tsp vanilla extract
200g self-raising flour
100g slivered almonds, roughly chopped
100g white chocolate chipsIcing sugar, to dust


What to do

(1) Preheat oven to 175 degree. Lightly grease a 20cmX30cm (base) lamington pan. Line the base and 2 long sides with baking paper.

(2) Melt the butter and chopped chocolate in a heatproof bowl over a saucepan of simmering water (don’t let the bowl touch water).

(3) Whisk the eggs, castor sugar and vanilla extract in a bowl. Stir in the melted chocolate mixture. Fold in flour. Add the almonds, chocolate chips and stir to combine.

(4) Pour into prepared pan. Using a spatula, spread mixture to the edges. Bake for 20 to 25 minutes or until the top has a firm crust.

(5) Cool in the pan, then cut into 15 squares. Serve dusted with icing sugar.


Saturday, November 28, 2009

Sausage Puff

After baking Chicken Pie , I still had some left over frozen puff pastry in the freezer which I wanted to finish them quickly to save some place for some other stuff (as my fridge is kinda small here). Hence, I made this mini sausage puff for today’s tea.

This is very simple to do which you just need to leave the frozen pastry to thaw for a couple of minutes until it is soft enough for you to roll up the sausage in it. I covered the top with some egg wash and sprinkled some white/ black sesame to make it look good. :P After that, I baked in the oven for 30 minutes and served while it is still hot!
It is so easy to do yet taste so delicious too! Give it a try, you will like it! Enjoy~


Thursday, November 26, 2009

Sweet & Sour Chicken

This is my first attempt on Sweet n’ Sour Chicken and I am very happy with the outcome! I love the sauce as it really boosts my appetite. This is very easy to prepare and taste yummylicious. It is really worth to give it a try! = )


Ingredients

500g chicken thigh, sliced
1 can pineapple
2 red chillies, sliced
1 onion, cut into thin wedges
2 tomatoes, cut into wedges
2 garlic gloves, chopped


Marinade the chicken

1 tsp sugar
2 tsp oyster sauce
1 tsp light soy sauce
1 egg
3 tbsp tapioca flour


Sauce

1 tbsp chilli sauce
3 tbsp tomato ketchup
1 tbsp sugar
50ml water (or canned pineapple juice)


What to do

(1) Clean chicken and remove the excessive fats on the chicken thighs. Cut it into smaller pieces.

(2) Season with marinade ingredients for at least 30 minutes. Deep-fry it in the hot oil until golden in colour. Remove from oil, drain well and set a side.

(3) Heat 1 tbsp of oil in the saucepan, add in the chopped garlic, onion wedges and stir-fry till it's fragrant.

(4) Add in sauce mixture and bring to boil. Add in fried chicken pieces, pineapple, red chillies and tomatoes. Stir-fry briskly until well combined.

(5) Thicken with the sauce with some cornstarch (*optional - just omit this step if the sauce already thick).

(6) Dish up and serve warm with steamed rice.

Sunday, November 22, 2009

Garlic and Parsley Bread


Garlic bread is my all time favorite and I just love the aroma of the garlic and the crunchiness of the bread. Hmm… yummy! I used baguette bread for my garlic bread but you can make it with other breads. So, choose your favorite!

Oh yeah, I’ve added some parsley as I thought it will look more colorful and I’ve also added some paprika so that it’ll taste a bit spicy. Well, they were great! Crispy and fragrant!!! = )
Ingredients

1 long baguette breads
3-4 garlic cloves, finely chopped
A bunch of flat leaf parsley, chopped
½ tsp paprika
Olive oil
Sea salt and freshly ground black pepper

What to do

(1) Slice each baguette diagonally at 1.5cm intervals.
(2) Sprinkle the garlic, parsley, paprika, salt and pepper evenly over each baguette.
(3) Drizzle generously with olive oil and place on a baking tray.
(4) Bake for 10 to 15 minutes or until hot and crisp. Serve.

Saturday, November 21, 2009

Easy Chicken Pie

I baked these chicken pies last Sunday noon for our afternoon tea. Originally I planned to make the pastry on my own but hubby said doesn’t want to be troublesome so he suggested buying the ready made puff pastry.

Well, I was thinking that it was a good idea too as I can use the remaining puff pastry for other recipes. As for the pie’s filling, I used chicken thighs and marinated for 30 minutes.


The filling...

Ready to go…

Done!


The meat was tender and delicious, the pastry was crispy too! You will need to serve the pies while it was hot if not, the pastry will be soft after a while.


Ingredients

400g chicken thigh, diced
100g vege mix1 medium onion, chopped
100g whole champignons, sliced
1 tbsp corn flour mix with 3 tbsp of water (to thicken the gravy)
1 egg, beaten (for glazing)
2 sheets puff pastry, thawed

Marinade the chicken

1 tbsp oyster sauce
1 tbsp light soy sauce
some salt and pepper to taste


What to do

(1) Heat a non-stick pan with olive oil. Sauté diced onion till it's fragrant and soft. Add the vege mix, whole champignons and continue to cook for a minutes. Stir in the chicken and cook till its juices are sealed in medium heat.

(2) Pour in the corn flour mixture and stir till the gravy is thickened.

(3) Preheat oven to 180 degrees. Invert pie moulds on puff pastry and cut around the moulds to form the lids of the pies. Set lids aside.

(4) Invert pie moulds on puff pastry and cut circles from the edges of the moulds.
Ease pastry circles into pie moulds, making sure there are no air bubbles under the pastry. Trim overhanging pastry with a sharp knife.

(5) Divide chicken mixture evenly among pastry bases.

(6) Brush edges of puff pastry with water and cover pies with puff pastry lids. Firmly press edges of pastry together with a fork. Make some holes on top of the pie by using the fork.

(7) Glaze the pies with egg wash and bake pies at 180 degree for 25-30 minutes. Serve hot!

LinkWithin

Related Posts with Thumbnails